Click here to visit ...

Wednesday, August 31, 2016

Note to Self: Do Not Do ...

Recently, i was playing with some new stuff - Artist's Concrete, and I wanted to put it into a mold I had. But the mold did not have a flat bottom, and I knew that it would be tippy, and that I needed to find a way to stabilize it.

Easy peasy - I'll make a snake of polymer clay, make a ring of it, and push the mold onto it and that will hold it flat and steady while the concrete sets. No problem.

And because I had another thing I was making with the concrete - a ring, which I stabilized in an upright and flat position by cutting a hole for the ring band in a styrofoam meat tray, I put the polymer clay (un-baked) onto the styrofoam tray as well.

So, a week or so later, when I go to clean up (because it is unheard of for me to clean up on the day of!), I discovered this.


The unbaked polymer clay has reacted over time with the styrofoam and make a gooey mess. It ate a channel into the foam, and stuck to the polymer clay, and just thoroughly went icky.

I had to throw both the clay and foam out. No biggie really, but lesson learned. Don't leave unbaked polymer clay sitting on styrofoam for any length of time.

Cheers!

Lessons learned!

I had to learn a very hard lesson yesterday. When your intuition tells you to go shopping for a new computer, you should listen very carefully!!! Rats! Earlier this week, I browsed around at Best Buy, made a tentative decision to buy a Notebook, and then toddled off home, to think about it a little more. What I should have done, was to immediately back up my, older than dirt, desktop!!! Insert a lot of bad words here!!!! I had absolutely no problems, until I tried to fire it up today, to hear strange noises, and see the dreaded hard disk failure message. So needless to say, today's artsy, beady post is not possible. Sure, I could post a little more from my iPad, but unfortunately the photos are currently locked inside my bleeping desktop! My apologies, and with a little help from the "Geek Squad", I hope to be back in action by next week. Fingers and toes crossed! Meanwhile, pull out your supplies, and do something creative. That's what I plan to do....perhaps a little more concrete play? P.S. - Please don't forget to back up your computer.

Tuesday, August 30, 2016

Join us at our annual Fall Back to Class event

The best teachers teach from the heart, not from the book.  ~Author Unknown

Getting back to school and learning new things isn't just for school-age children. It's for the rest of us too! 

Our imaginative and resourceful instructors have pulled out all the stops to share beautiful and new projects this Fall. Our classes feature techniques in all jewellery-making mediums including beadwork, metalwork, mixed media, knotting and fibre, and lampworking.


Saturday, September 10
11:00am - 3:00pm

Come on out see the beautiful projects and meet the instructors who are teaching them! For each class that you register for at the Back to Class event, you will receive a ballot toward a $25 Gift Certificate that can be used for future classes or merchandise. One class = one ballot; two classes = two ballots, and so on!

Plus we'll have lots of door prizes and refreshments. Bring a friend - all are welcome to this FREE event!

To see the list of instructors that are confirmed to attend, go to the September class page or click here. There is no need to pre-register or RSVP for this event - simply come on out for the fun.

Here are just SOME of the new classes scheduled for the Fall:


Monday, August 29, 2016

Millefiori

By Cindy Goldrick

Millefiori translated from Italian to English as "thousand flowers" and it's a glass technique that dates back to Roman times. Examples have been found in the Sutton Hoo burial site so we know that "mosaic beads" as they were called were a hot and highly valued trade item. The island of Murano was home to the technique for hundreds of years but the secret to making the murrini canes died out and was revived in the 1800s.

Here is a picture of the millefiori I work with in my enamelling. Very tiny and very pretty flower shapes. I must confess mine are likely at least 50 years old as my neighbour gave them to me and they had been tucked in a stash she inherited from an older woman who was a glass artist in the 60s. I've not seen millefiori quite like them anywhere. 


I then place them into my enamelled designs. When they are heated along with the glass enamels, they spread out into beautiful flower shapes. It's a fun way to create enamelled glass compositions. Here's an example of some finished pieces I created.


Local artist Virginia Wilson Toccalino creates beautiful murrini canes and composes them into stunning paperweights. Her work was captured by the How It's Made people and you can watch a short You Tube Video of her creating millefiori paperweights here. 


You can get millefiori through Thompson enamels. They cost $9USD for about 100. 


Of course, the technique was taken up by polymer clay artists. It's a bit easier to work with forgiving clay and roll it out with your hands than it is to work in hot glass and pull canes of glass. But the results can be equally as stunning. 

So incorporate a little bunch of millefiori into your life and you'll find their petite perfect beauty will make you smile. 

Sunday, August 28, 2016

InspirationFX: Iridescent Wrap


Iridescent Wrap

by: Dwyn Tomlinson

Oh myyyy! This iridescent teal and magenta 'leather' is so awesome - it is leather on the back and the front has a texture that I think is makes the shifting colours - anyway - there was no way to resist it. And after cutting myself a couple of feet - I didn't want to cut it again - so I just made a long wrap out of it. It looks great on.

I put the first slider bead in the centre, more or less, and folded down the tabs on the back to keep it in place. I then put it on, wrapped it around my wrist, and found the center for the next one, put that slider on, positioned and secured it, and the same for the third. They wound up being located at 3 inches, 8 inches, and 9 inches - which is weird, but they line up when I wear it, so who cares?

The ends with the loops got a little dab of glue on the back, and then squeezed shut with pliers, and finally - a couple of random jumprings for the toggle and you are good to go!


Components

Go to our components list for this project and to buy what you need!
Need some help with some of the techniques? Check our tips page.

Thursday, August 25, 2016

Diamond Duos!!

27888120-02 Czech Shaped Beads - 2 Hole Diamond Duo - Dark BronzeWhen you think Duos - you think Batman and Robin, Laurel and Hardy, Fred and Ginger, Holmes and Watson, or Peanut Butter and Chocolate. Or possibly Pinky and the Brain.


Anyhoo - there is a new dynamic, dynamite duo on the block - Diamond Duos! Or DiamonDuos - both spellings seem to be in use!
These new beads on the board are a diamond shape , flat on one side and faceted on the other, with two holes, running from side to side.

With their flat sides, I can already picture them fitting together in pinwheel shapes, stars, flowers and mandalas. And with 60+ plus colours rolling out - you'll have lots of colours to play with!

Check out this pattern on Beading Daily for a DiamonDuo and Demi-Round bracelet that is evocative of snake scales.

So between picking colours and pinteresting for patterns, I predict a beady good time for you!

Hot dog - it's a hot flash - Hotfix, flashbacks, er - Flatbacks, and other rhinestones - 20% off! Hot damn!
Czech 11/0 seedbeads. What the heck - have another week at 20% off! 


And so there it is for this week - click on a link or image above, or just check out all the new items here and see what docks your yacht!

Bead Happy!

Wednesday, August 24, 2016

A concrete idea!

Well, I couldn’t let Dwyn have all the fun, could I? I was the second person in the store, to nab a container of Create Recklessly, Artist’s Concrete, and I need to confess, that I’ve already used up half of my supply. This stuff is seriously fun to work with, and I’m just getting started!
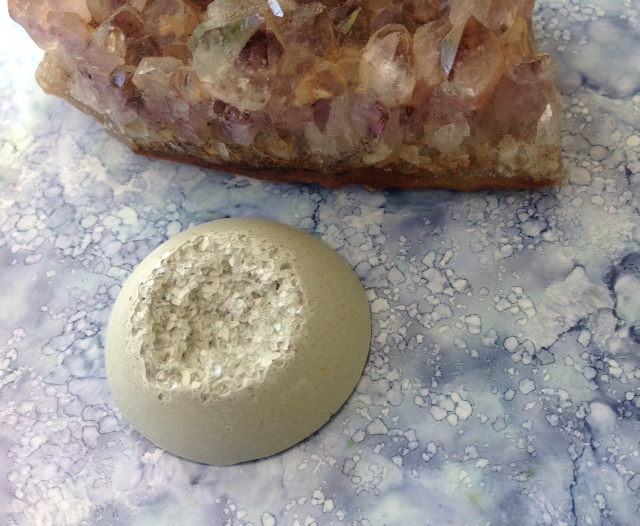
Many of you know that I love to experiment, so instead of showing you my first efforts, I’ll show you a few of my final ones (okay, I’ll show you all of them, but I like these the best). The idea is not my own, as I did spot a YouTube video, that showcased this technique. All you do is dump some glass glitter (the coarser the better) in the bottom of a mold, and then pour the concrete over top. The concrete flows around, but doesn’t seep all the way through the pile of glitter. When the concrete is dry (wait for at least an hour), take it out of the mold, and then shake off any excess glitter, for a fabulous hollow, faux druzy effect!! It’s better to use a clean mold, as the concrete will absorb any dust, dirt, or leftover pigments.
I've heard that you could use Alcohol Inks (AI) to colour the concrete, but that you should be careful with the quantities used (of course, they didn’t provide the recipe!). I erred on the side of caution, and only used four drops of colour. Either the colour I chose (Adirondack “Pool”) wasn’t strong enough, or I should have used more, as the AI only lightly tinted the concrete (the second photo in the post is the one with the AI). However, I’m not too worried, as there’s plenty of time for further experiments. I didn't use any pigments with the heart mold, but don't you just love it? Even better, it was a freebie, sent with an on-line purchase.
By this time, I was getting tired of glitter (not really, but for the sake of science, I had to try something else), so I tried mica flakes, and then some tiny rocks (that I had purchased for my October, Bead Embroidered Pendant class). I’m not that thrilled with the blue mica, but I absolutely love the rocks!! The cabochon reminds me of a dragon’s egg, and now I need to buy a teeny, little dragon, to see if I can play mommy!
Next I dusted mica powders in the bottom of a couple of molds, and then poured in the concrete. The coverage on the face cabochon turned out a little spotty, but I do love the starfish, seashells and button! The white shell is natural, and is from the first batch of concrete that I poured.
Next up, open backed bezels! I dug into my stash (for a couple of them) and added some packing tape to the backs (making sure that I burnished it well, to ensure complete contact with the metal). These bezels are pretty thin, so I carefully dripped in a little concrete (with a toothpick), spread it out to the edges, then lightly dusted on a bit of leftover glass glitter. I rather like the effect, don’t you?
Back to experimenting! Rochelle had gifted me some rusty road kill (random bits, picked up at the side of the road), and I thought that one of the larger washers would be perfect in the bezel. I added it right after the pour, and to my surprise (silly me!), it started to sink!!!! Oh no, what should I do? Of course, I added another smaller washer, and this time, right on top of the first. Perhaps not a perfect solution, because the proportions are off, but I haven’t given up on the piece! I still have the option to either glue, or draw something on the concrete. It's interesting to note, that the rust has started leaching out into the concrete. I'm not really surprised, but it's something I hadn't considered.
These faces illustrate the fabulous detail you can get with this product. I used a bit of the plum pigment (Create Recklessly) in one of them, but feel that I should have actually added more. The bumpy, organic piece is from a mold I made from a Lychee Nut shell, that Pam gave me. Now for the downside - An imperfect mold = an imperfect piece, so don’t be surprised if some of your pieces don’t come out perfectly. Just remember to throw out those molds, and start again!
As you can see, I’m quite excited by this product. My ideas seem to multiply like rabbits, and I plan to continue to explore my concrete ideas, in a concrete sense! Will there be an Artist's Concrete workshop in the future? Keep tuned, but first I feel the need to play!

Tuesday, August 23, 2016

Learning Really is for Life!

September! Back to school, back to work and back to a routine. It's also a chance to start a new venture and learn a new skill (why should the kids have all the fun!) 

Once again, we are holding our special Back to Class event so you can see for yourself the wonderful class projects that our instructors have developed and are ready to teach. Mark  Saturday, September 10 in your calendar now to attend!

Also coming up in September are our classes with Jean Power. An acclaimed designer, artist and author, Jean hails from England and is well-known for her geometric beading. Bonus: with each class you will receive a $40 Gift Certificate that can be used toward your class supplies or saved for future use!

Here are the classes and open sessions scheduled September 1 - 10
and Jean Powers classes later in September:


Thursday, September 1
FREE Afternoon Bead Tea
Facilitator: Pamela Kearns
Bring your projects and and any questions.


Wednesday, September 7
FREE Open Bead Night
Facilitator: Pamela Kearns
Be among the first to see the new weekly products.


Thursday, September 8
FREE Afternoon Bead Tea
Facilitator: Pamela Kearns
Bring your projects and and any questions.


Instructor: Pamela Kearns
5:00 - 9:00pm
Perfect for the complete novice to get started in an exciting new pastime.


Open Metal Studio: Kiln Enamelling
Facilitator: Christine Woollacott
5:00 - 9:00pm
Bring your projects and get tips and assistance from Christine.


Saturday, September 10
FREE Back to Class Event
11:00am - 3:00pm
Door prizes, refreshments and chances at a $25 Gift Certificate.


Kitchener Memorial Auditorium Complex (The AUD)
400 East Avenue, Kitchener, ON
BeadFX will be participating in this fun packed show for knitters!


 Upcoming classes with Jean Power:

 Friday, September 23
Sparkle Stars
Instructor: Jean Power 
10:00am - 5:00pm


Saturday, September 24
Armarria Series Bracelet
Instructor: Jean Power
10:00am - 5:00pm


Sunday, September 25
Sticks and Stones Bracelet
Instructor: Jean Power
10:00am - 5:00pm

Complete information about each activity is available by clicking on the title. You can also go to www.beadfx.com and click on 'Classes'. Follow the links to the September class calendar and click on the individual classes and sessions.