Click here to visit ...

Thursday, December 31, 2015

So long 2015!

We (the store) are closed for the week between Christmas and New Years, reopening on Saturday, Jan 2, 2016. We (the website) will remain open, of course, 24/7. ;-)
Well - another year done and dusted and just about put to bed.
tc94-2033-26 Metal Charm -  Celtic Round Drop - Antique Gold (1)tc94-3056-26 Findings - Connector - 1 : 5 Beaded Bar - Antique Gold (1)
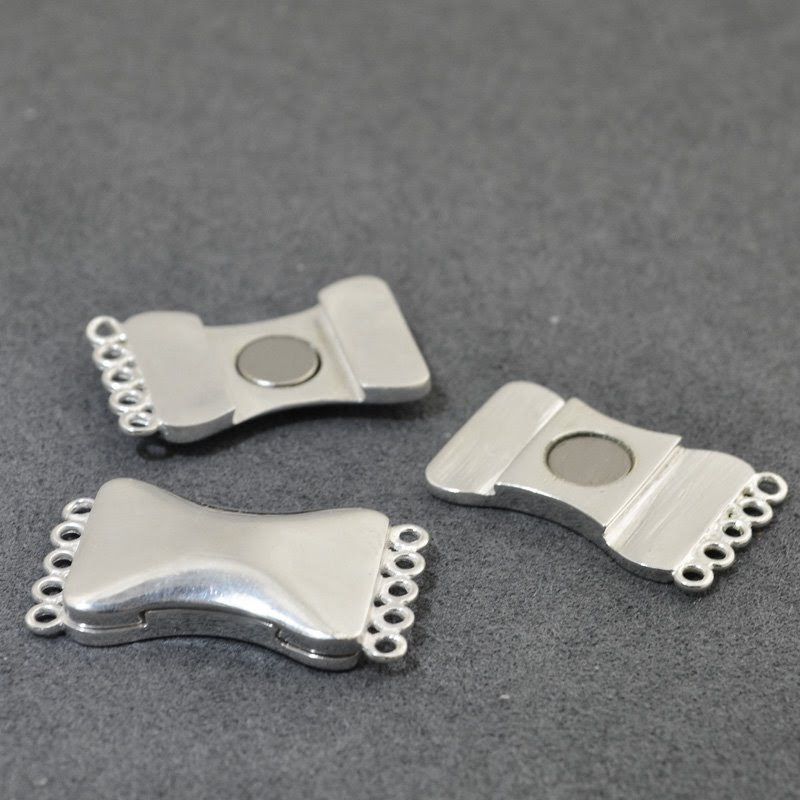
This week - we round out the year with a big collection of Tierracast metal connectors and charms and separators and stuff!
If you are looking for the ultimate in multi-hole connectors - check out this bad baby! 12 strands! Woohoo!
tc94-3171-40 Findings - Separator/Connector - 12 : 1 12 Hole End Bar - Antiqued Pewter (1)
tc94-3116-26 Findings - Separator/Connector - 4 Hole Beaded Bar - Antique Gold (1)


tc94-2343-13 Metal Charm/Pendant -  Heart Lock Frame - Metal Noir (1)If you are into the mixed media these days - resin and clay and epoxy clay - we've added more of the bezeled frames. You can glue in a picture and resin it, or put a polymer clay cane slice in, or how about polymer clay and stamp a message in - those metal stamps work just as well on polymer clay! Or press in a ball of epoxy clay, press some rhinestone chatons in, and dust with MetalFX! You know - it's not too soon to think about Mother's day gifts. ;-)


You can check out all the new items here!


So what's up for the new year?

Well - we're doing some significant overhauling on the website. We've noticed that a LOT of you are using the website from your mobile devices - phones and tablets - and we want to make it easier for you. We'll keep you posted - but expect a cleaner, more streamlined look in the future that works on the desktop and goes mobile with ease!

Wednesday, December 30, 2015

What's on my bead mat?

Or perhaps I should say, "what's on my bead mat", and rolling around in my head, this week? I had a lovely, quiet holiday, and find that when I have time on my hands, my hands just naturally turn to creative pursuits. During the holidays, I watch sappy movies, eat more snacks than normal, and search for projects to play with. Although, I do start new projects, I confess that I love to dig into some of my UFO's (unfinished objects)! Not just components (stash), but projects that I've started, and haven't found the the time, or inspiration to complete. I'm happy that I managed to finish my free-form peyote beaded bead, but both dolls, are still works in progress!
The starfish (doll form, purchased from a friend), is a definite what if? What if, I used freeform peyote, to bead a doll? What if, I combined it with intuitive bead embroidery? What if, I resisted the internal urge, to finish the doll quickly? Interestingly enough, this doll is turning out to be quite challenging. Freeform is all about problem solving, and some problems, just don't want to be solved quickly! I'm a lot further ahead, but my mind needs rest, before agreeing to unlock more of the puzzle pieces. The second doll (designed and stitched by yours truly), was started in my last doll workshop. She's a little sad, but is sitting patiently on my messy worktable, waiting for me to throw her a few beads. Poor neglected baby!
On the mixed media front, I spotted a simple tutorial, somewhere on the web (sorry, but I didn't save it), showing someone making beads, out of two-part epoxy clay (either Apoxie Sculpt, or Crystal Clay), grommets (or were they eyelets?) and wooden beads. Of course, I just had to try it, and then expand on some of the steps (my mind just never stops). I painted the beads with Vintag Patinas, distressed them, and then added Iced Enamels and micro beads (but only to the larger one). Not perfect, but the technique definitely shows promise. In addition, I made a rather sloppy attempt, at a flower cabochon, while using up some of my leftover clay (remember, I'm still not a sculptor...). But what's happened to those pearls, you say? Absolutely nothing! I did make a little bracelet, for a future Inspiration, but ideas for my pearls, are just not coming......Perhaps next week! Right now, I seem to be more interested in my rusty cloth, hand embroidery project (I'll sneak a few photos in, one day!).
I've also been getting up close, and personal with more than a few blogs. One of my favourites is The Altered Page, by Seth Apter. Absolutely nothing to do with jewellery, but his mixed media, graffiti style, does fill my eyes with colour, and my head with trends and techniques. If you're interested, check out this post! You'd be surprised at how easily transferable, some of his colours, ideas and trend watches, are to your jewellery projects.
Rest, relax, and try to finish off just one more project, before the year ends. Be safe, and I promise that we'll chat more, next week, and next year!

Sunday, December 27, 2015

InspirationFX: Kumi Ladder Bracelet

InspirationFX
Get your creative juices flowing


Kumi Ladder Bracelet 
 
by: Pam Kearns

We often talk about the products we carry and wonder how we can use them
in ways that may be different or unexpected and we were specifically
talking about the 1mm wire lace. It's not a product that I've regularly
used so I wondered how it would do up as a basic 8-strand kumihimo -
it's wonderful! The thin braid it creates has a nice shine to the finish
and you can sew through the braid. I was able to get a 39" length of
braid from the four spools of wire lace I used so I used the braid to
make a ladder bracelet (instead of the traditional leather) and
Swarovski pearls. The result is an elegant double wrap ladder bracelet
that can be used for more dressy wear.

To get started, you need two double-strands of 4 colours of 1mm wire
lace. The easiest way is to pull the lace off of a spool, fold it in
half (giving you two pieces) and folding both pieces in half again (now
giving you four pieces). Do this for all four spools; you will have a
total of 16 strands of wire lace - 4 strands of each colour. Knot the
ends together.

Set up a round foam kumihimo disk - I set it up as two strands of Dusty
Rose on both sides of N; two strands of Merlot on both sides of S; two
strands of Turquoise on both sides of E; and two strands of Navy on both
sides of W. You will want to spool the excess wire lace onto kumihimo
bobbins to keep it from tangling. Proceed to do basic 8-strand kumihimo
for the length of the wire lace you have on the bobbins. (if you need a
refresher or how-to on basic kumi, see here for a video:
https://www.youtube.com/watch?v=yaakS09cj6k).

When you've done your length (approximately 35 - 40") tie off the
strands into another knot and trim the excess wire lace.

Now you'll prepare to make the ladder bracelet. I used a clip board and
a bull-dog clip; others have used a beading tray and bull-dog clips to
help hold the materials in place.

I needed to cut one of the knots to slide on the button; it is a little
tight but squish down the end (it is wire) and slide it to the middle of
the length of kumi braid. Retie a small knot in the end of the kumi.
Fold the braid together at the button and tie together with the thread;
wrap around the braids 2 - 3 times and secure with a knot. You can sew
through the braid as well. Thread the needle and travel a little bit
through one braid and exit the bottom braid about 1/2" from where you
tied the two braids together. Thread on one  8mm pearl and go around the
top braid and back down the pearl to the bottom braid. Go around the
braid back to front and thread on another pearl - you are creating a
figure-8 pattern attaching each pearl. You want the pearls to be
touching but not overly crowded. If you need to see some visual
instructions on how to do a ladder bracelet, click on
http://beadwork.about.com/od/beadedbracelets/tp/Leather-Wrap-Style-Bracelet-Tutorial.htm.

Work down the length of the kumi braids adding the pearls; add thread as
required. For my wrist size (approx. 6 1/2") I used 43 pearls (approx.
13 12/"). Wrap it around you wrist to see how the fit is going allowing
for a loop to go over the button. When you have reached the desired
length, travel your thread along one braid and join both braids together
with a couple wraps and secure. Travel further down the braid and wrap
and second time creating a loop that will fit the button. Secure and trim.

To finish the ends, the Silver Silk terminators work very well! Cut off
the knots, dab some E6000 glue on the ends and pinch the terminators
onto the kumi braids.

That's it - enjoy!


Components

Go to our components list for this project and to buy what you need!
Need some help with some of the techniques? Check our tips page.

Thursday, December 24, 2015

Christmas at BeadFX!

'Twas just before Christmas and all through the store,
Erin was packaging just one Delica tube more.
Anne Marie and Malliga were putting out stock
Beads and some mats and some semi-precious rocks.

Lee was getting the mail ready to go
“Man, this is going incredibly slow!”
Bonnie was checking the orders with care
So that customers soon would receive all of their fare.

Amanda was counting the beads by the score
And in the process, dropping lots on the floor.
Rae and Kelly are with customers much
Helping them choose colours, sizes and such

Rosemary in the studio was setting up tools
Dwyn came in with beads from Dragon Jools.
Dan joined the group with a tablet in hand,
Ready to barcode the entire land!

The staff were working contented to be
Doing their thing independently
Then what to our wondering eyes should appear
It was Marg with goodies from Costco to share!

Some candy, some brownies, paper towels and more
Coffee and snacks, and crackers galore!
To the top of the shelves, to the cupboards they go
Put them away, make it just so!

Then Kathryn put out seedbeads all in a row
Tracey was in the kitchen getting a cup of 'joe.'
Cleaning the cabinets and the class display
Pam was getting ready for Meet the Teachers day.

Rochelle was placing more orders with care
In hopes that the products soon would be here.
At the end of day, when all has been set right
We say to you all, Merry Christmas and Good Night!


tc93-0441-18 Metal Beads - 5 mm Plain Heishi Spacer - Antiqued Copper (50)And thanks to all the staff - who wrote this - as I have been having computer issues. - Dwyn. 

There is new stuff this week - a melange of metal spacers - but we know you are busy with the holidays. If, however, you need to escape - the new stuff is all here.

Holiday Hours
We (the store) will be open until 3 pm Christmas Eve (Dec 24th) and then we (the store) will close for the week between Christmas and New Years, reopening on Jan 2, 2016.
 
We (the website) will remain open, of course, 24/7. ;-)
Happy Holidays! Be safe. Be good, and if you can't be good, have fun.

Wednesday, December 23, 2015

Holiday hours


We (the store) will be open until 3 pm Christmas Eve (Dec 24th) and then we (the store) will close for the week between Christmas and New Years, reopening on Jan 2, 2016.
 
We (the website) will remain open, of course, 24/7. ;-)
Happy Holidays! Be safe. Be good, and if you can't be good, have fun.

Reflections on an exploding stash!

Santa Baby, I've been a very bad girl this year!! I purchased tons of stuff, with absolutely no idea, what I was going to make! Sure, I whipped up some class samples, and made an Inspiration or two, but did I really need all of those pearls? I ask you, would you?
Then, let's chat about the paint I purchased. Yes, I absolutely needed the Pebeo Fantasy paints, Adirondack, Alcohol Inks, Ice Resin, Iced Enamels, Gilders Paste, Mica Powders, and Spectrum Noir markers, for workshops I was teaching, but did I need so darned many of them? Not to mention seed beads, shaped beads, stones, buttons, bezels, rusty objects, found items, and perhaps even a cabochon or two. Should I mention the findings, threads and tools? It doesn't matter, because they make me happy, and if that means that Santa is not going to slide down the chimney this year, then so be it!
Now, how about talking about the stash from my pre-beading life, when I fancied myself a fibre artist? I own piles, and piles of thread, paint, paper, embroidery floss, and even a bunch of yarn (despite the fact, that I don't knit). It's not like it suddenly disappears, in a puff of smoke, when I head off in a new direction! It's still there, and it's clogging up my studio, and if the truth be told, my living and dining room, and storage area. When will I ever learn? I'd be embarrassed to show a photo of said studio, so I won't....but believe me, you're not missing anything! Sign me up for hoarders anonymous!
So, in the interest of full disclosure, I've been participating in an international paper swap, for a couple of years. Do I need more paper? No, of course not (except as collage fodder for my altered dominos), but I still signed up for 2016 (if anyone is interested, it's www.paperswap.com). It's a fun way to add some unusual papers to your stash, and meet a bunch of lovely people, along the way. Should I mention the fact, that I also monoprint my own papers (mainly for collage, paper beads, and swaps), via a wonderful tool, called the Gelli Arts, Gelli Printing Plate? You'll need to look them up, because they're not sold in the store (but I do use the printed papers, in several of my workshops). There are tons of YouTube videos on the subject, and it's just waaay too much fun!
I'm not really one to make resolutions, but if I were, I'd vow to make a pile of pearl pieces, and perhaps a few mixed media projects, over the holidays. In addition, I would dust off my neglected sewing machine, and give my beads, a little dose of fibre, for good measure! You see, I love it all, and it saddens me, when my older treasures are neglected. But seriously, I really do need to purge and organize my stash!!!
It's an exciting time of the year, despite the fact that Toronto is having unseasonably mild temperatures (by contrast, the above photo was taking after the ice storm, on December 22nd, 2013). There is, no chance of a white Christmas, but that's not stopping us, from celebrating the spirit of the season. So with that, I'll wish you all a very Merry Christmas, and to those that do not celebrate, a happy and healthy holiday of your choice. Enjoy your time with family and friends, and if you get a chance, try to relax, with a few beads! You've earned it!

Tuesday, December 22, 2015

Bringing the World to Our Classroom
2016 Visiting Instructors

BeadFX is very fortunate to be able to attract high-calibre instructors to teach in our store. This coming year we will have several instructors with specialties in various jewellery-making mediums including lampworking, beadwork and metalwork. While we haven't yet arranged all of the details as yet (projects, costs, etc.) we do have the dates when the instructor are coming. Mark your calendars now and plan to join us! Details about the classes will be up on our website as quickly as possible.

Kim Fields - lampworking
Sculptural Bird Beads
Saturday, April 9 & Sunday, April 10


Kim Fields began making glass beads in 1999 after an introductory lampworking course lead her to the book, “Making Glass Beads,” by Cindy Jenkins. She attributes her bead making skills to a number of great and renowned teachers, including Sage and Tom Holland, Leah Fairbanks, Loren Stump, and several other accomplished bead makers.

Nature has always inspired her creativity and is the primary influence for her beads. Lampworking has brought Kim tremendous joy, and she continues to explore new techniques in order to evolve as a bead maker. Kim teaches bead making, and her beads can be seen at numerous shows, galleries, and online at www.northfiredesigns.com. She lives in Metamora, Michigan, with her husband, Stu, and their Scottish terrier, Rosie.

Robyn Cornelius - metalwork
May 6, 7, 8

Canadian instructor Robyn Cornelius has a degree in Fine Arts – majoring in Jewelry and Metals – and believes in taking as many classes with as many teachers as possible to continue growing in her art field. She has her own custom design studio in Edmonton, Alberta, called Little Rock Jewelry Studio.

Robyn’s method of teaching enables her students to “jump right in” and not be afraid to wander creatively in metalwork. She is constantly stretching herself as an artist and brings that creative energy into the classroom. 


Amee K. Sweet-McNamara  - soutache and bead embroidery
May 13, 14, 15

Amee K. Sweet-McNamara uses Soutache and Bead Embroidery to create textile jewelry with sinuous, organic shapes in brilliant hues. She takes her inspiration from all things color-saturated. Mucha posters, Venetian glass, Renaissance paintings, and Hollywood dance-costumes have all, at one time or another, influenced her creations. Formally educated in both, Interior Design and Fine Art, McNamara is a member of the League of New Hampshire Craftsmen. She teaches out of her studio in Merrimack, New Hampshire, and venues across the country including The Craft Center at the LNHC headquarters in Concord, New Hampshire.

Why is her business called "Amee Runs with Scissors?" Because it sounds a lot sexier than "Amee Eats Paste."


Carolyn Cave - beadwork
August 19, 20, 21

A self-taught bead artist living in Alberta,  Carolyn enjoys the endless creativity derived from stringing and stitching “little, round, shiny things with holes in them”. This is both a frustrating and exhilarating way to fill in the spare moments of her very full days as a wife, mother of three young ladies, and musician. Creativity has always played a large role in her life, from sewing clothes for Barbie at a young age, to experimenting with a wide variety of arts and crafts; from earning a Degree in Music and playing several instruments, to making jewelry. Her creations are inspired by a wide variety of things – the colors and shapes of the natural world, works of vintage and antique beaded art, the encouraging comments of her family, and the many hours spent “composing” with needle, beads and thread.

Her work has been published in “BeadandButton” and “Beadwork” magazines, and she has been a winner in multiple categories of BeadStar every year since 2011. Carolyn is also the author of the recently released book "Beautiful Designs with SuperDuos and Twin Beads", published by Kalmbach. You can see some of Carolyn’s work on her Facebook page, Lady Beadle Designs.  


Jean Power - beadwork
September 23, 24, 25

We are very excited to welcome back this popular instructor for a third time! Jean Power is an award-winning jewellery designer, writer and teacher based in London, England. She first began making jewellery in 2001, having already spent many years painting as well as exploring different aspects of fibre and textile arts. While she continues some of these interests, beading, wirework and chain maille are her main love and she tries to use them in conjunction with her other interests.


Hannah Rosner - lampworking and beadwork
October 14, 15, 16

Hannah has been lampworking since 1992 and beadweaving since 1986. She holds a MFA from The Ohio State University in theatrical design. She began teaching both lampworking and beadweaving in 2000 and has taught at bead stores and bead societies across the US.

Hannah was a semifinalist in the lampwork category for BeadDreams 2009, and won a second place award for her bead embroidered collarpiece in the Treasures of Toho 2009 Contest. The Treasures of Toho necklace can be seen in the February 2010 issue of Bead&Button magazine. In 2011, her Neptune's Tail Necklace won third place in the Bead and Jewelry category at the Vegas Craft Expo. In 2012, she took First Place in the Advanced Sculptural Division in the Treasures of Toho Contest for her Gaea's Glass Slipper. You can see the shoe in the December 2012 issue of Bead&Button magazine.

Monday, December 21, 2015

InspirationFX: Hammered Shine


Hammered Shine 
 
by: Anne Marie Desaulniers

I should actually call this necklace
 "What If?", because it's the end result of asking myself a
 series of questions.

 1.  "What if" I textured some smooth metal circles,
 with the skinny, rounded end of my Chasing Hammer?  -
 lay ring flat on a steel block or anvil, and strike gently
 with hammer, until satisfied with the texture. Remember to
 texture both sides of the ring.

 2.  "What if" I joined the circles with Swarovski 4mm
 Bicones links, made with wire wrapped loops, on both ends? -
 see "Tips & Techniques" page for instructions

 3.  "What if" I made something symmetrical for a
 change?

 4.  "What if" I fell in love with the SW Kaput Oval
 Pendant, in Crystal Light Chrome?

 5.  "What if" I mixed Sterling Silver with
 Silvertone?

 All of those questions, resulted in this light and easy
 necklace!  The monochromatic colour scheme, makes it
 quite versatile, allowing it to be worn with either jeans,
 or dress clothes.
Component Sets:

 Right Side - Two Jump Rings/Hammered Circle/Two Jump
 Rings/Bicone with Wire Wrapped Loops on both ends (6
 sets)/Bar End of Toggle Clasp

 Left Side - Two Jump Rings/Hammered Circle/Two Jump
 Rings/Bicone with Wire Wrapped Loops on both ends (6
 sets)/Circle End of Toggle Clasp

 Bottom (Y)
 - join bottom two Jump Rings on Right Side, to a new
 Hammered Circle
 - join bottom two Jump Rings on Left Side, to the same
 Hammered Circle

 Pendant - attach to Hammered Circle in Bottom (Y) - Two Jump
 Rings/Bicone with Wire Wrapped Loops on both ends/Two Jump
 Rings, joined to Two more Jump Rings/SS Bail/Oval Kaputt
 Pendant

 Change it up, by adding or subtracting components, using
 different metals, smooth rings, or different coloured Oval
 Kaputt Pendants.

 Enjoy!


Components

Go to our components list for this project and to buy what you need!
Need some help with some of the techniques? Check our tips page.

Sunday, December 20, 2015

InspirationFX: Christmas Time


Christmas Time

by: Bonnie Cottingham & Malliga Nathan

Being with Family and Friends
Tinsel and Garland on the Trees
Glistening Snow,
Carols on the Radio
Driving through the Neighbourhood at night; looking at the Colourful Lights on the Houses,
Cards that Cover you with Glitter!
These are the Things I look Forward to during the Holiday Season.

Need a quick gift idea to give the Sparkle of the Season?
These earrings go together quickly!

Run a small bead of glue E600 along the edge of the bezels.
Give it a few minutes to set up.
Press the Rhinestones into the bezel.
Fold the bezel prongs over the rhinestone.
You will need to place them with the rhinestone facedown to dry.
After the glue has set attach the earwires.
Voilà!
Christmas Sparkle!


Components

Go to our components list for this project and to buy what you need!
Need some help with some of the techniques? Check our tips page.

Thursday, December 17, 2015

Claps and Japser!

If there are two words that take the prize for my having to backspace and correct them it is clasp and jasper. So - what do we have this week? Lost off claps and japsers.


s47412 Findings - Magnetic Clasp - 5 Strand Interlocking Flat Sliding Clasp - Sterling Silver (1)Lots of new clasps this week! From multi-strand to fancy to all the metal colours - a big update of clasps! Check out the clasps, you might find exactly the one you want, or the one that inspires you to start something new!


s47026 Findings - Clasp - Toggle -  Flower Vine - Antiqued Copper (1)
tc94-6082-26 Findings - Clasps - Toggle - 2 Strand Rope Wrap - Antique Gold (1)
tc94-6191-27 Finding - Toggle Clasp - 24 mm Set - Slotted D rings and bar - Brass Oxide (1)
s46994 Findings - Clasp - Toggle -  Square with Curliques - Bright Gold Plated (1)


And Red Porcelain Jasper. This has warmer colours, a bricky-red and greys instead of the mauvey overtones of the other Porcelain Jaspers. s47549 Stone Beads - 6 mm Round - Red Porcelain Jasper (strand)
s47553 Stone Beads - 12 mm Coin - Red Porcelain Jasper (strand)


s12382 Stone Beads -  Carved Lily Flower - Milky Quartz (1)


And last, but not least - Carved-Stone Flowers. These elegant lily-type flowers, carved in stone, make a striking pendant. Hang a tassle of seedbeads from the center to simulate stamens for a pretty floral look.
s16230 Stone Beads -  Carved Lily Flower - Unakite (1)


s47609 BeadFX Discovery Kit - Large Custom Craft Bag and Supplies - Discover Wireworking
If you'd like to give the gift of the joy and wonder of beading, we have assembled some Discovery Kits for you - custom designed in-house to make it easy for you. We have assembled a selection of kits that include our beautiful Yazzii Bags and a selection of tools and supplies appropriate to Beading, Wire working or Stringing! You're welcome!


Also hot on the gift-horizon are the do-it-yourself Rhinestone bracelets, and we have new colours of the ss 29 size Chatons. More colours means more ways to please!

You can check out all this week's new stuff here. Go forth and Bead Happy!

Holiday Hours
Our store will be open until 3 pm Christmas Eve (Dec 24th) and then we will close for the week between Christmas and New Years, reopening on Jan 2, 2016.

Our online store will remain open, of course, 24/7. ;-)